Restoring Old Furniture
Written by Cathryn
Cathryn's article does exactly what it says on the tin...
The hope of this article is to give those hesitating, the impetus to have a go and to encourage those who do it – to contribute their own tips on the forum. It was clear when I suggested this article that there are a lot of skilled people with a lot of useful ideas already using the forum (well there’s a surprise) and I am hoping that they will add their ideas and we can all head towards becoming experts.
Firstly the disclaimer, until you have had a go with several pieces of old furniture I would suggest that if you do have a potentially valuable antique it would be best to consult an expert before you do any work on it yourself. I am also hoping that someone else will add their own woodworking practices as I can only do minimal carpentry repairs myself. Consider whether the furniture should be restored. Over restoration is horrible, beautiful old clocks looking like they came out of the workshop yesterday, all shiny and clean and in my eyes totally ruined. Some pieces are beyond restoration and could be taken apart and their useful bits remade. Be warned – as you get hooked you will start to hoard. It’s no good repairing an old piece of furniture with a new piece of wood so better not throw that 150 year old elm draw front away, it might come in useful someday…
Before you bring your auction or junk shop treasure into the house have a good look at it for any sign of woodworm. Try and have a look at every bit of it, all the dark dusty corners – small holes mean that some of the woodworm have already left, new specks of fine dust by the holes suggest that some may be still at work. (Random holes over fronts and sides suggest someone has been hard at work with a compass adding authenticity!) The best way to deal with woodworm is to freeze them! Put the piece of furniture in your deep freeze and lower the temperature even further overnight. I have also left larger pieces of furniture outside during a really hard freeze. If neither of these options are practical then unfortunately there is no alternative other than to use chemicals – you shouldn’t need very much (and if you do consider replacing some of the wood instead) and follow the instructions for it’s use carefully – it’s not nice stuff.
Now you have to decide what needs doing. Are all the joints sound? If not they will need to be re-glued and or repaired before you begin on any surface finish. Wood glue is immensely strong stuff and is likely to outlast the wood itself – its disadvantage is that if the joint has become loose it all has to be removed. To get a strong secure joint the old glue has to be scraped off. A chisel is very handy to use for this. This can be a labour of love and you need to consider the time it might take and your commitment to it before you buy any piece of furniture that will need taking apart and re-gluing. I have found that chairs in particular need to be completely dismantled to make them properly sound again. This is not impossible to do but it can take a lot of time. The plus side to this is that if you have fallen in love with a beautiful but rickety old chair at a farm auction – you are likely to be able to beat the bids of any dealers there, as it is simply not going to be cost effective for them to put the time into restoring it.
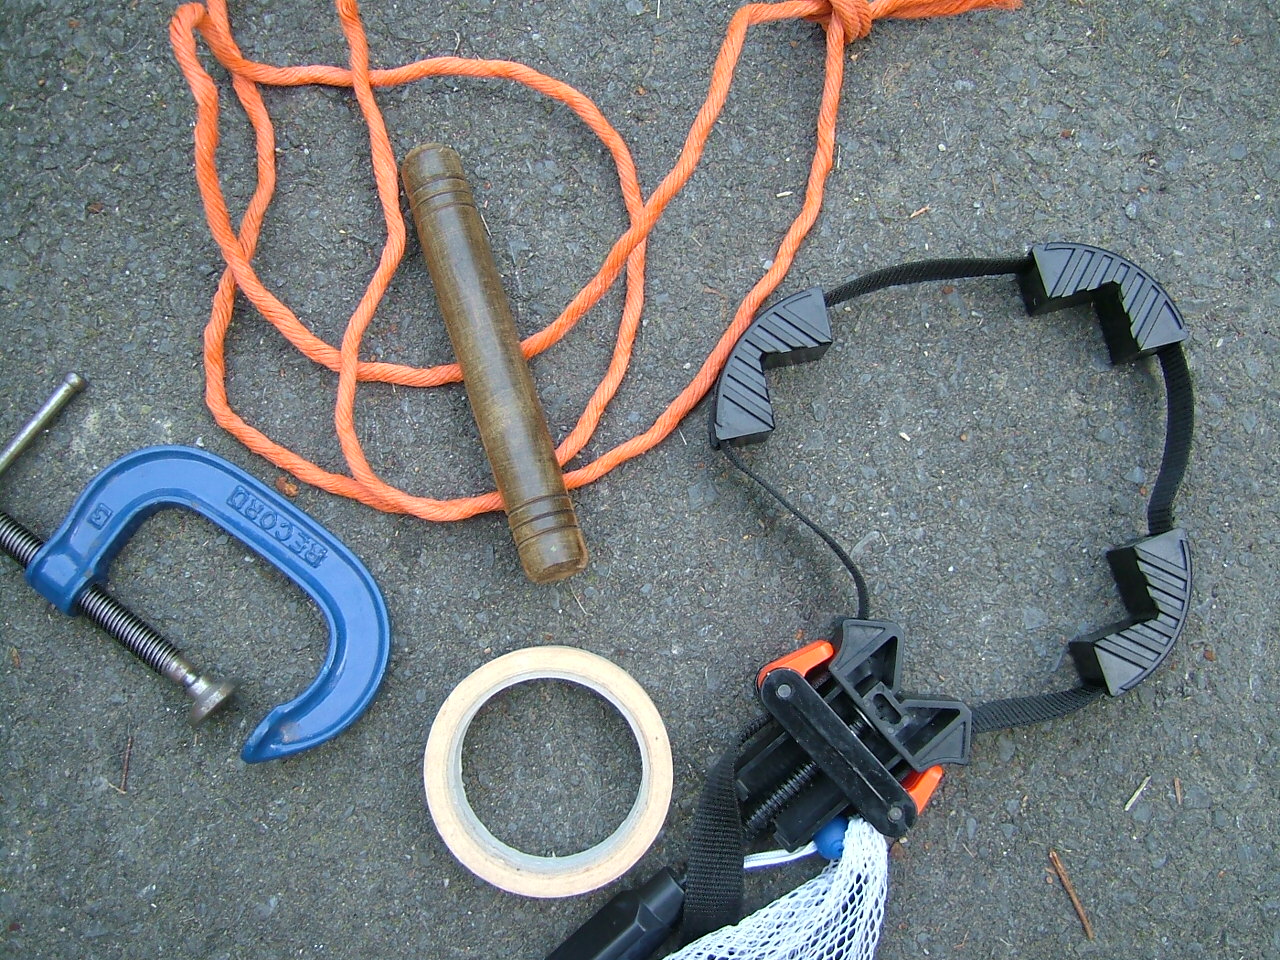
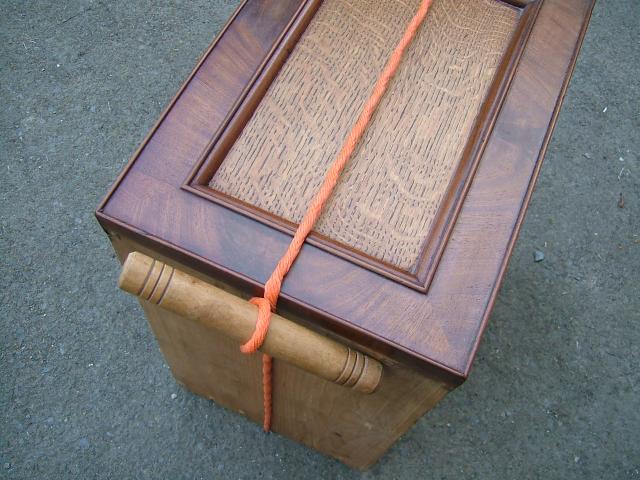
If you find that the cleaned up joint is now a bit loose use small pieces of wood (matches perhaps) to make it tight again. Glue the whole lot together and cramp it firmly while the glue dries. You can use a length of rope for this rather than going to the expense of buying the proper thing. Knot it around the furniture so that the joint can be held in place and tighten by twisting the rope on a stick. Place smaller blocks of wood between pressure points where the rope tightens on the wood – so as not to damage the article you are repairing.
On a small item – freezer tape is very effective, stretched firmly across the join. Wipe up any glue that has oozed out of the joint straight away, with a barely damp cloth and then leave it alone to dry completely.

Sometimes you will find that drawers don’t fit well because they have warped a little or panels have bowed. Wood moves a lot. I have reshaped drawers by covering the problem with a slightly damp towel and positioning it in the sun. The wood will move gently back into position. Take your time and experiment and work out where to position the towel and which side of the article should be in the sun.
Small dents in the furniture can sometimes be ironed out. Use a slightly damp cloth and a warm iron. Again take your time and do it carefully but it is worth trying this if the dent is unsightly and you are going to have to restore the finish anyway. (Anything damp placed on wood will dull the surface a little.)
Some finishes are very hard to achieve at home and require a great deal of skill to do properly, for example French Polish. There is a poor man’s version of this using button polish that can give a high shine to furniture. It requires a lot of elbow grease! This is maybe why I prefer a soft waxed finish and buy furniture that will look good like this. The old furniture of rural Wales tends to be made of the oak which used to cover the landscape. This lends itself well to a soft shine. (There is an argument that you should restore the furniture back to it’s original finish – I leave that one with you.) I have only ever once bought furniture that was French polished and this was so damaged that running a finger over it caused a lot of it to flake straight off. It didn’t take much work with fine wire wool to reveal a lovely silvery oak chest of drawers underneath. French polish was the fashion at the time so a rather inferior polish had been added to what would have otherwise been regarded as a commonplace piece of furniture.

Sometimes the old flaky varnish will need to be removed before you start working on your own fine finish. Try using different grades of wire wool to do this and you might find that you can avoid using any chemical strippers. For large items like doors you are probably better using commercial stripping companies. I will leave others to discuss this area as I rarely need to strip the furniture I buy. However there are a couple of things to be careful of if you have to have something dipped; try to have it dipped for as short a time as possible and be careful when you buy some painted country furniture – they were sometimes painted with a red lead type of paint. Even dipping never successfully removes this and you would be better off smoothing down to a good surface and repainting the furniture.
If the wood looks a bit dull and flat use an appropriately coloured wood stain to put warmth back into it. I tend to use a medium oak stain for everything – but then I favour oak furniture. If you are lucky – you will find that that the spirit based stain will soak through any old glaze and still give a smooth finish and it will sometimes vanish water marks as well. There are bleaches and stain specifically for lightening or darkening more stubborn watermarks and ink marks on furniture. They can still be bought in some hardware shops or online. They should be applied with a fine artist’s brush, thin layer at a time, only on the mark, until the effect you want is achieved. Sometimes these “flaws” can add to the piece – my children have all made good use of an old school desk which I think would be ruined if I remove the generations of inkblots and graffiti on it.
I then use a furniture wax, again with a stain in it if it’s appropriate for the wood. Brush it on with something like a soft shoe brush or with fine grade wire wool – in the direction of the grain. Leave it to dry then polish off hard with a soft cloth. Put some energy into this and repeat – brushing on wax and then polishing off two or more times (I usually find I do this until I run out of energy!)
Let each layer of stain, wax, whatever, dry properly before moving onto the next one.
At each stage you might find that you need to use some fine wire wool to give a smooth finish. Always sand and smooth in the direction of the grain. Swirly marks left if you don’t do this are the very devil to remove.
Stand back and admire.
Post script: I learnt the basics of restoration from an antique dealer who had been working with antiques all his life and for a large part of it he had lived in and helped restore a national trust property. He had a huge amount of knowledge but the most important thing he taught me was to have a go and try it – experiment, wood is lovely stuff and very forgiving. If you really do make it a mistake it is rarely a disaster. It is usually quite easy to rectify it and start again (very irritating mind you).
With thanks to dpack for his help and suggestions |

