Make a Manly Work Shirt
Written by sally_in_wales
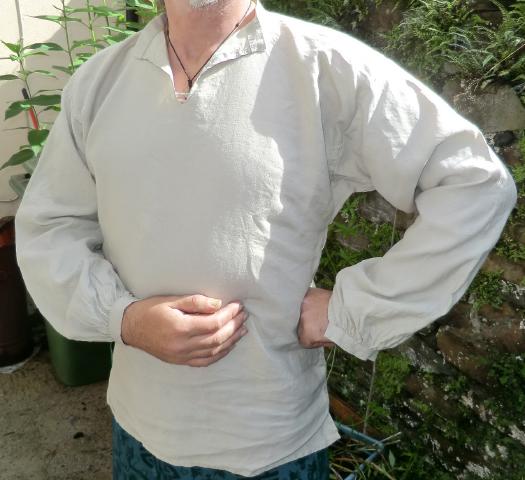
I handsewed an example of this shirt at the 2012 skillshare over numerous cups of tea, conversations and just possibly a small libation or two and the merest morsel of cake...
Its loosely based on a traditional style of shirt in use from the medieval period onwards, and uses incredibly simple cutting methods to create a comfortable, practical, and to my mind, flattering shirt. It can of course be worn by women too, but I think the unfitted shape does particularly suit men.
You need:
Linen or cotton or another suitable fabric. This is a shirt to be worked in, worn and washed, so pick something tough, unfussy, and comfortable that the wearer can feel relaxed in.
Cutting:
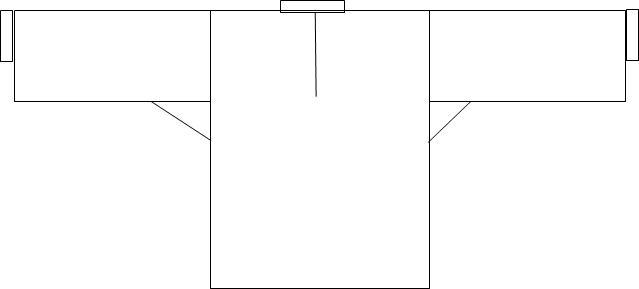
You need 4 rectangles and two squares, plus some strips for collar and cuffs. Cut two body pieces by measuring the width of the shoulders and adding between 4-8 inches depending on how loose you like it (N.B: double check that this measurement will be at least half the widest chest, belly or hip measurment for more ample figures, add a bit if needed, or for figures with much wider belly to shoulder ratios, make the shapes wider at the bottom to allow space). The length should come down to approximatley the lower hip, or as desired to tuck in or wear out. You may choose to omit a shoulder seam and just use a double length body section.
The sleeves are rectangles, the length of the arm from shoulder to wrist, and at least the width of the measurement of the flexed bicep plus a couple of inches. Baggy or not is up to you, just ensure there is foom for the upper arm muscle to work. You also need two square underarm gussets, approximately 4-5 inches square. The square gussets allow extra movement room and also lots of air space for comfort when working hard.
How much fabric you require will depend a lot on the width of the cloth and the size of the shirt, but for a smaller size, I can just get one out of 1m of 60" wide linen, I'd normally plan for having 1.5m available for most larger sizes and would expect some leftover scraps to turn into other things. The measurements in the diagram below will give a small-middling size shirt and use just a fraction over a metre. For Gareth's shirt, which was fairly voluminous and should fit most of the larger sizes, I went for sleeve pieces 65cm square and a body 75cm wide. That gave me excess to pleat into the sleeve head and I also took a small box pleat in the back of the neck to reduce width across the shoulders there.


Making up:
Whether you handsew (I suggest run and fell seams) or machine seam (I like French seams, but plain seams with zigzagged edges is perfectly functional), the shirt is simple to assemble and doesn't need any fancy tailoring skills.
Start by sewing the gusset into the sleeve and finishing the sleeve seam.
Join the shoulder seam in the body pieces if there is one.
Then sew the sleeve into the body and finish the body seam. If you have opted for a very baggy sleeve, you may wish to gently gather or ease a few inches at the top of the sleeve into the top of the shoulder to reduce bulk.
Look at the neck, find the centre point and cut a small t-shaped slit just large enough to get the head through. Put the shirt on the intended wearer and draw in the required neckline. If in doubt, trace the approximate base of the neck, and with a small centre front slit that should be plenty big enough.
Add collar (gather any excess fabric into collar band) Slit body to whatever level on the chest allows easy use of shirt or suits your tastes. Add a narrow hem to the slit.
Add cuffs (leave a small slit in sleeve to allow for easy rolling up over elbow).
Hem the shirt body, leaving small slits in side seams if you like, its entirely optional.
Add any fastenings you feel necessary. Small buttons or a hook or tie at the wrist, possibly one at the neck.
All done.
This style of shirt is easy to wear, easy to launder, has no fancy or fiddly bits, and has plenty of room to allow bodies to bend and flex when working hard. I personally think it looks really nice too and suits many body shapes (kilt optional)

|

